
Azure Spring Clean 2022 - Microsoft Defender for Cloud - Hybrid Cloud Security Posture Management
Community ·Thank you very much to Joe Carlyle (@wedoazure) and Thomas Thornton (@tamstar1234) for organizing this event again this year. This is my third year participating and find this to be a great initiative with great content. Follow the #AzureSpringClean hashtag for daily content on https://www.azurespringclean.com/. Follow #AzureSpringClean on social media for daily posts on content.

In this post, I will provide guidance for configuring and managing Azure, hybrid, and multi-cloud resources within Microsoft Defender for Cloud for complete security posture management of your infrastructure. After configuring resources for security posture management, you will be guided on how to configure vulnerability scans on these resources for next level security posture management.
Simply enabling and deploying these solutions into your infrastructure is not enough. You should also have a strategy for how you are going to monitor and manage these layers of defense within your infrastructure.
Cloud Security Posture Management (CSPM) is the method for monitoring and managing these defenses to audit, assess, and identify potential vulnerabilities and threats that may be within our infrastructure. This constant process allows you to address the possibility of potential attacks before they take place, and be diligent and proactive in the changing threat landscape and evolving cloud infrastructure.
A strong CSPM solution evaluates and provides the following features and characteristics:
-
Zero Trust based access control. This considers the active threat level during access control decisions.
-
Threat and vulnerability management. Providing a holistic view of the organization’s attack surface and risk and integrates it into decision-making.
-
Technical policy. The application of guardrails to audit and enforce the organization’s standards and policies to technical systems.
-
Real time risk scoring. That will provide visibility into top risks
-
Discover sharing risks. To understand the data exposure of enterprise intellectual property, on sanctioned and unsanctioned cloud services.
-
Threat modeling systems and architectures. Used alongside other specific applications.
Within Microsoft Azure, Microsoft Defender for Cloud (formerly Azure Security Center) provides CSPM for Azure and hybrid infrastructure resources.
Microsoft Defender for Cloud is Microsoft’s CSPM solution. Microsoft Defender for Cloud offers two options for security posture management within your Azure subscription, enhanced security off, which is a free service, or enhanced security on, which is a pay as you go service based on the resources that you are monitoring.
The free subscription to Microsoft Defender for Cloud is turned on by default when you create your Azure tenant. Defender for Cloud will then provide the following CSPM features to your Azure subscription:
-
Continuous assessment and security recommendations
-
Secure score
The continuous assessment of Azure resources is used to provide the Secure score. The Secure score is made of the following components:
-
Current score - Each control contributes to the total score.
-
Max score - Points that you gain by implementing all recommendations for a control.
-
Potential increase -Score increase if you remediate all recommendations.
-
Improvement actions - Recommendations for controls that can increase your secure score. Quick Fix applies these immediately.
These features are helpful to review your Azure infrastructure and determine actions that you can apply to better protect your subscription against vulnerabilities and threats. For increased CSPM, you should review enabling the enhanced security features of Microsoft Defender for Cloud.
These features include the features provided with the free service, plus the following features:
-
Just in time VM Access. Just in time VM access provides a time-bound NSG rule to open port 3389 or 22 for remote virtual machine management, decreasing the time that an attack surface is left open.
-
Adaptive application controls and network hardening. These controls help to protect against malware and provide machine learning powered recommendations on how to protect your workloads.
-
Regulatory compliance dashboard and reports. For companies that have regulatory compliance requirements, these dashboards will audit and assess your current controls and infrastructure against these requirements and help you to prepare for a compliance audit.
-
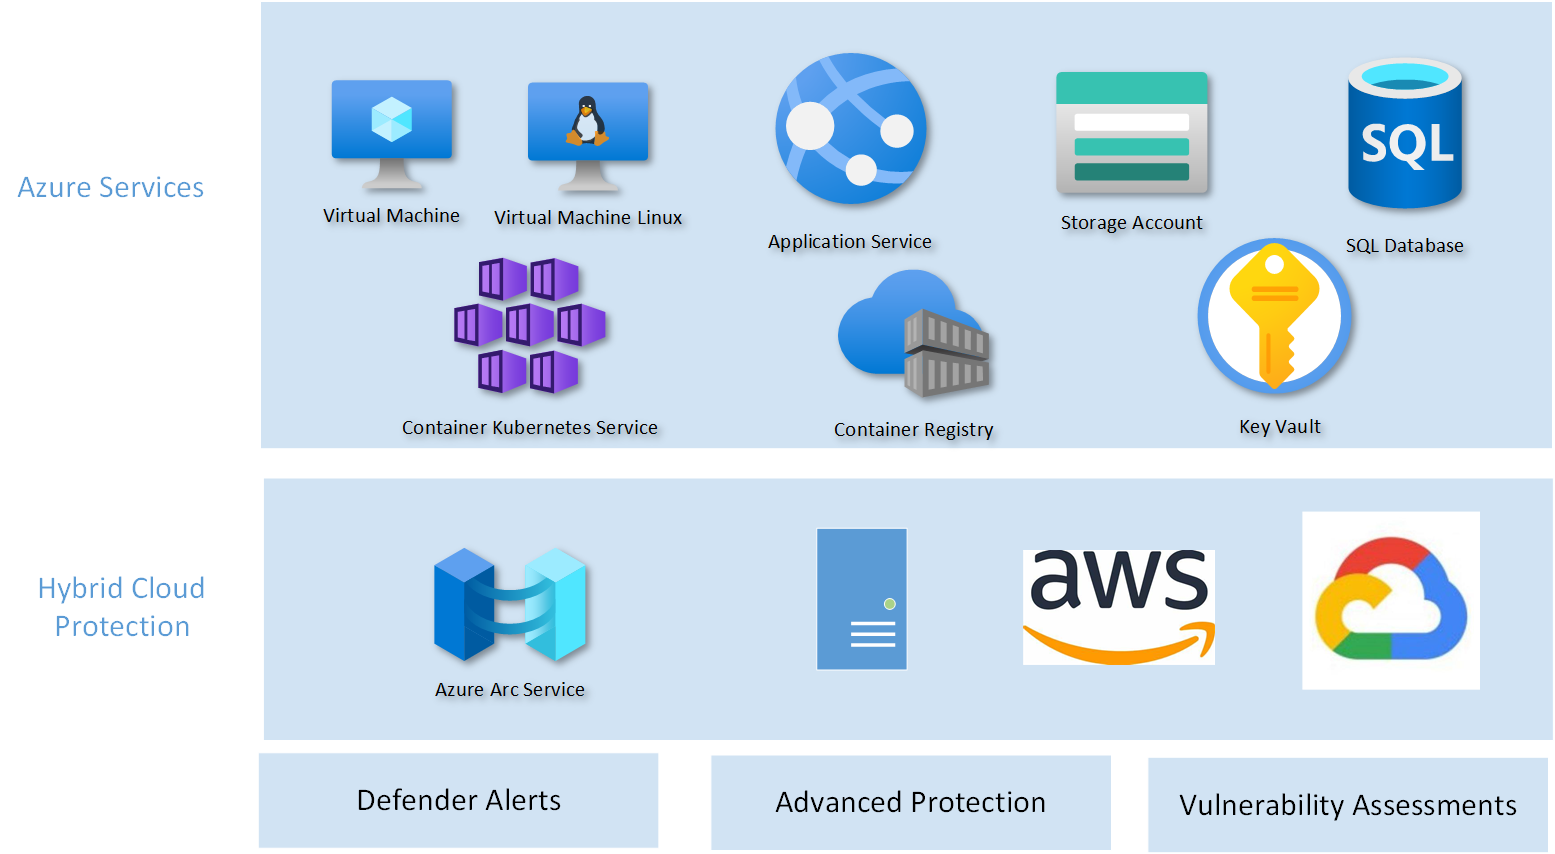
Threat protection for Azure VMs and non-Azure servers (including Server Endpoint Detection and Response (EDR)). Using hybrid infrastructure tools such as Azure Arc and Microsoft Defender for Endpoint, you can monitor and manage Azure and non-Azure servers. Non-Azure servers include on-premises, Amazon Web Services (AWS), and Google Cloud Platform (GCP).
-
Threat protection for supported PaaS services. Enhanced security services also provide threat protection for App services, containers (Azure Containers and Azure Kubernetes Service), container registries, Azure DNS, Azure Key Vault, SQL Databases, and Azure storage accounts.
Figure 1 shows how the Azure and non-Azure infrastructure that can be monitored and managed with the enhanced security features turned on.
More information on these enhanced security features can be found at this link: https://docs.microsoft.com/en-us/azure/defender-for-cloud/enhanced-security-features-overview?WT.mc_id=Portal-Microsoft_Azure_Security.
Now that we understand the features and functionality of Microsoft Defender for Cloud, we can configure resources to manage your security posture.
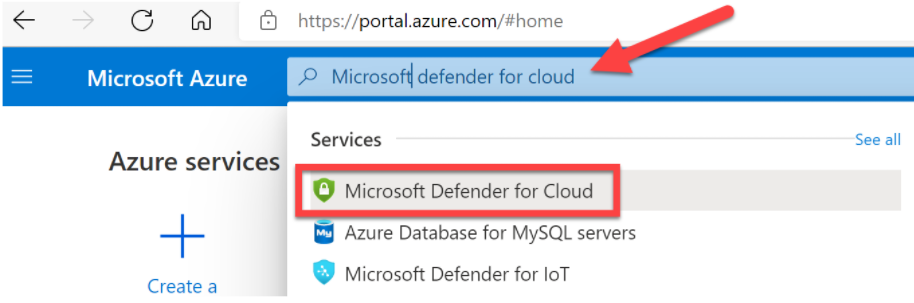
We will start by logging into https://portal.azure.com and in the search bar, enter Microsoft Defender for Cloud. Select Microsoft Defender for Cloud as shown in figure 2 below.
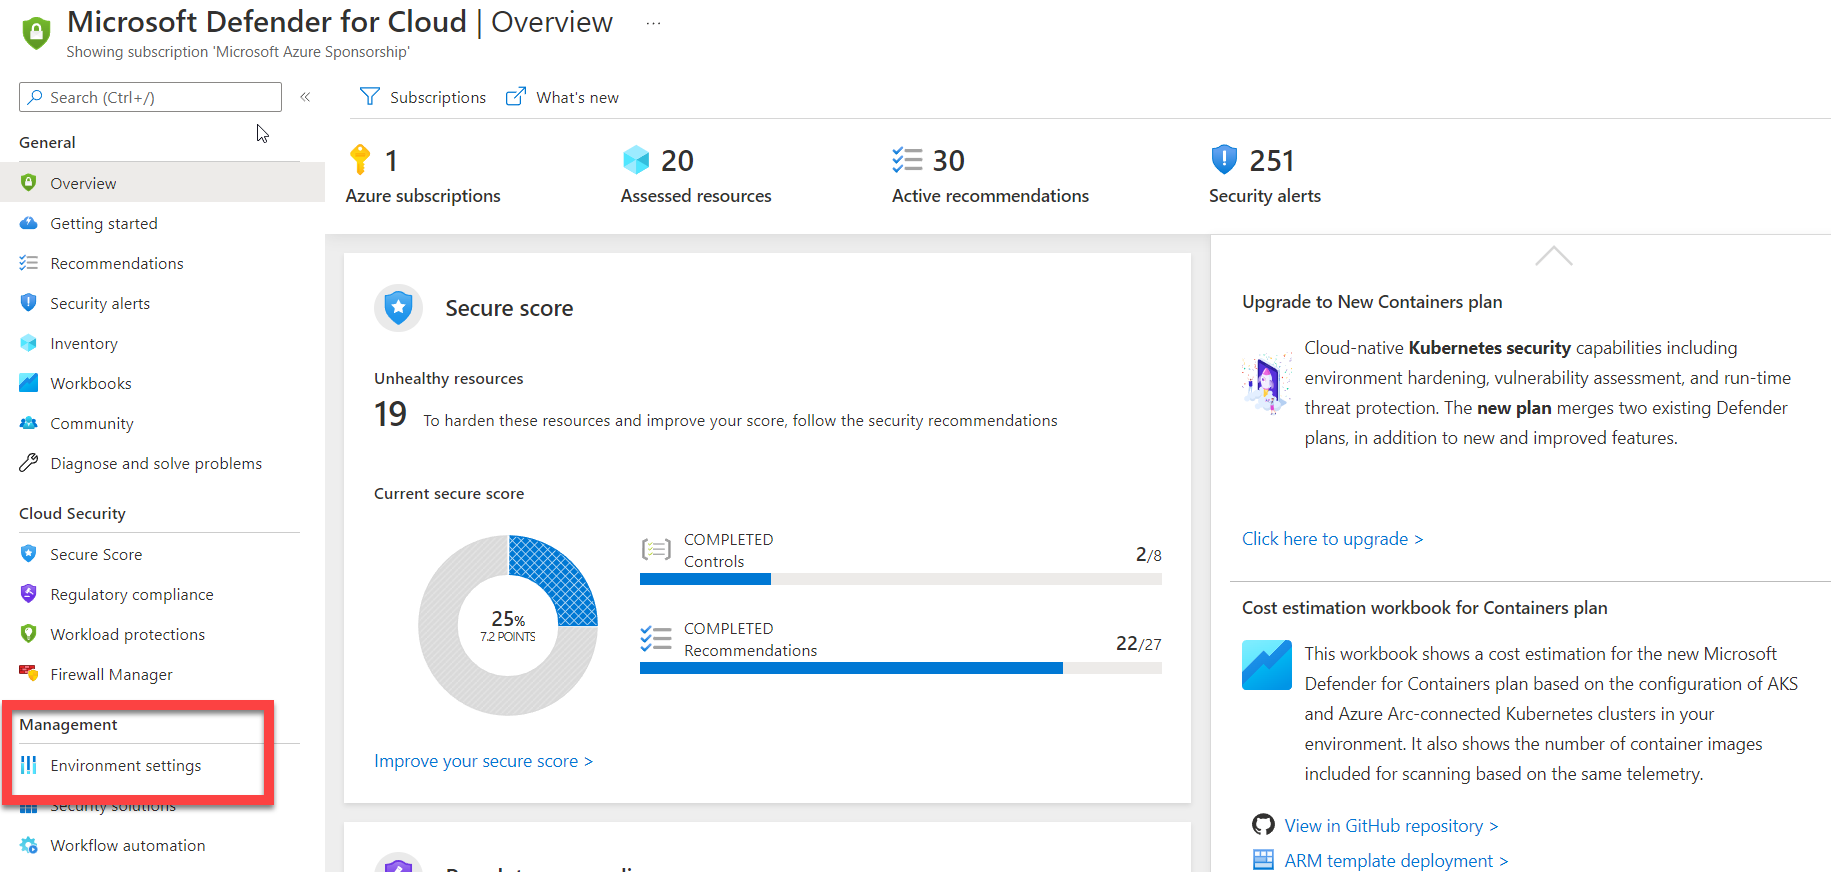
| This will take you to the Microsoft Defender for Cloud | Overview tile. |
In the overview tile, locate Environment settings under the Management menu, as shown in the figure below.
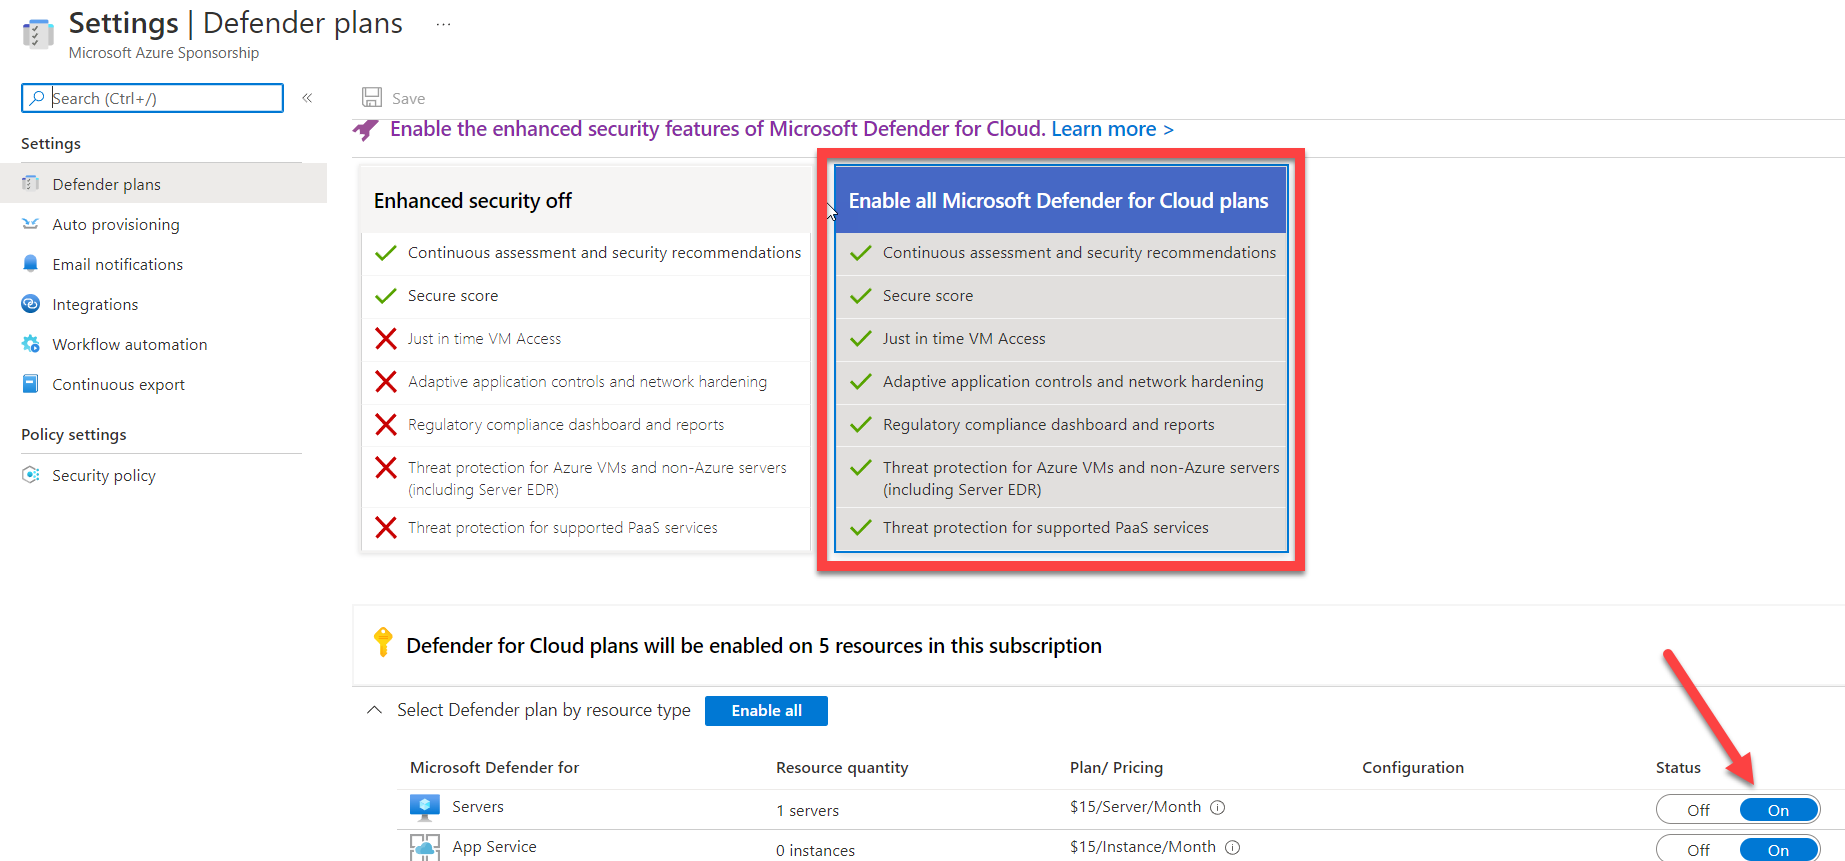
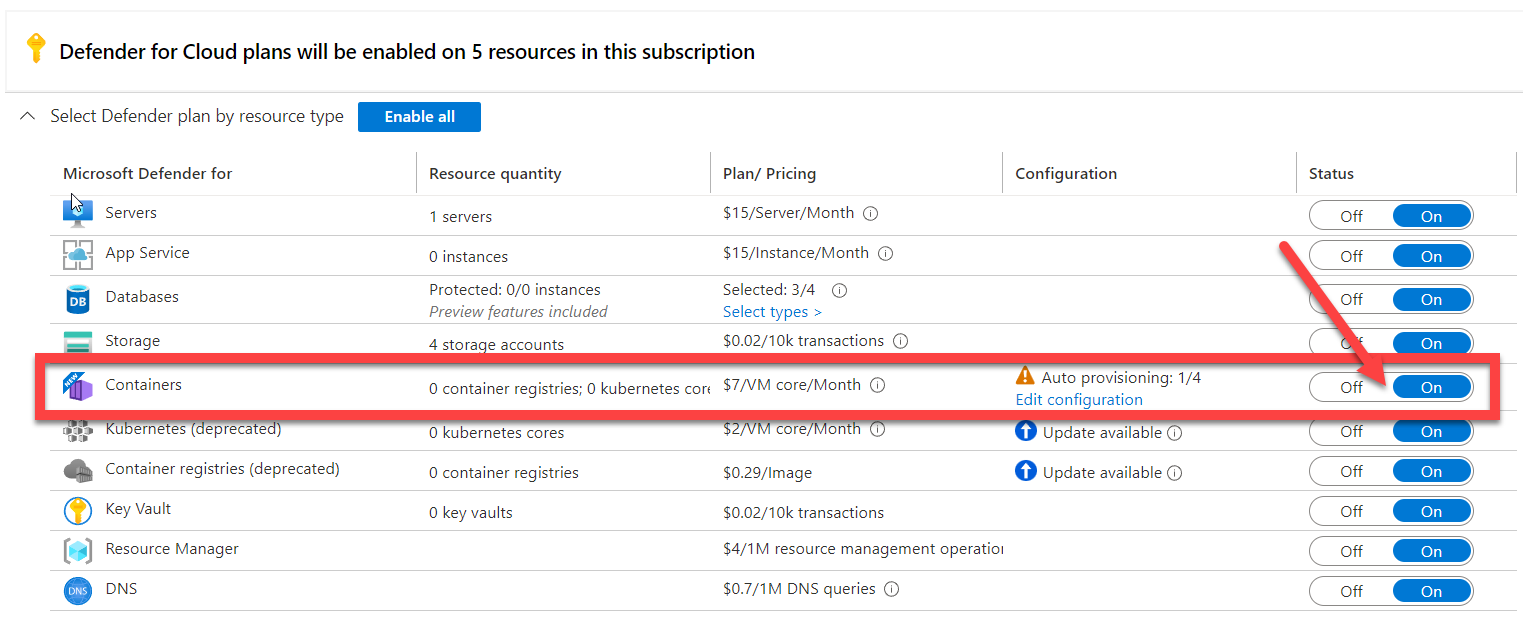
| Select your subscription and you will be taken to the Settings | Defender plans. Within the Defender plans settings, you will want to select the Enable all Microsoft Defender for Cloud plans. This will allow you to manage the security posture for hybrid and multi-cloud resources. |
Now that you have enabled the Microsoft Defender for Cloud plans, we need to configure auto provisioning for our Amazon Web Services (AWS) and Google Cloud Platform (GCP) compute resources. For any hybrid or multi-cloud connection to Microsoft Defender for Cloud, you will be required to have Azure Arc installed on the virtual machines. In addition, you can extend Microsoft Defender for Cloud to Google Kubernetes Engine (GKE) Standard clusters and Amazon EKS when the containers Defender plan is turned on.
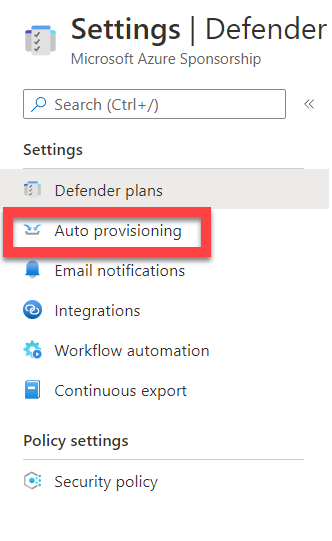
Next, in the Defender plans settings, locate Auto provisioning in the Settings menu.
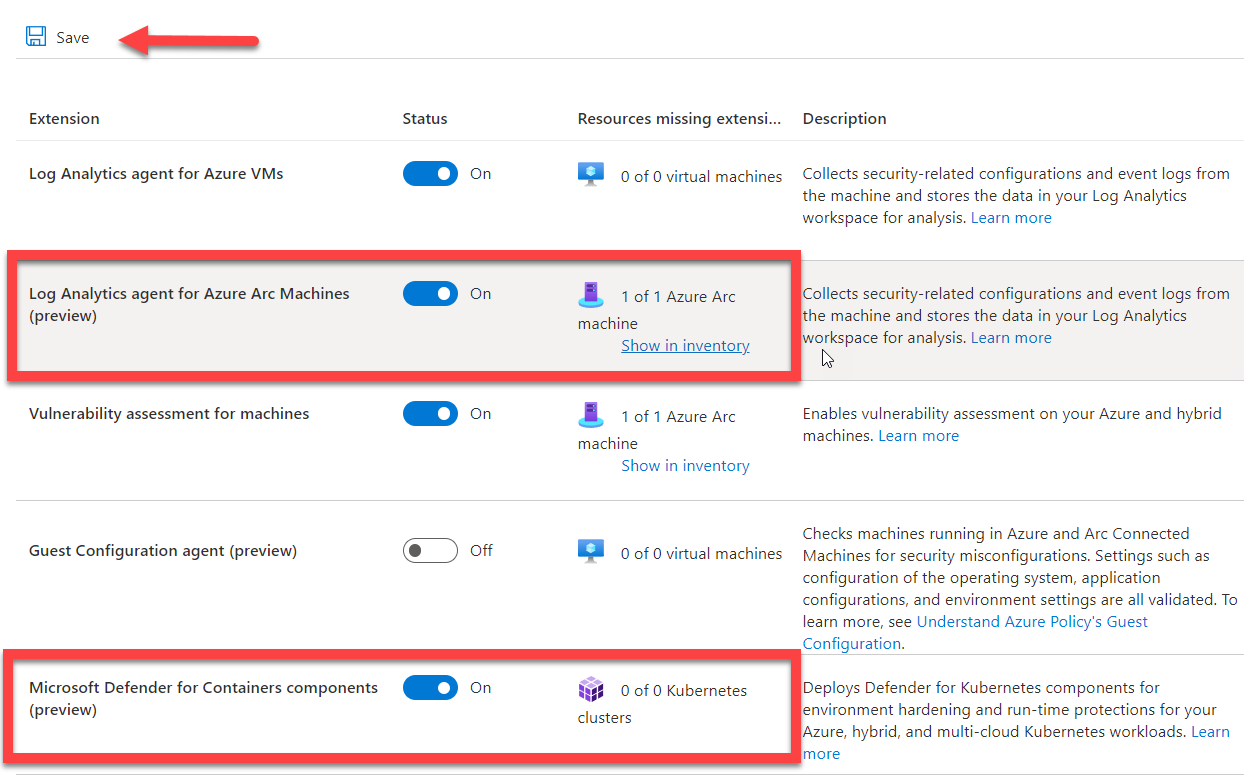
Set the status for Log analytics agent for Azure Arc machines and Microsoft Defender for Containers components to On and select Save. Any AWS, GCP, or on-premises compute devices that have Azure Arc installed will now have the proper Microsoft Defender for Cloud agents installed.
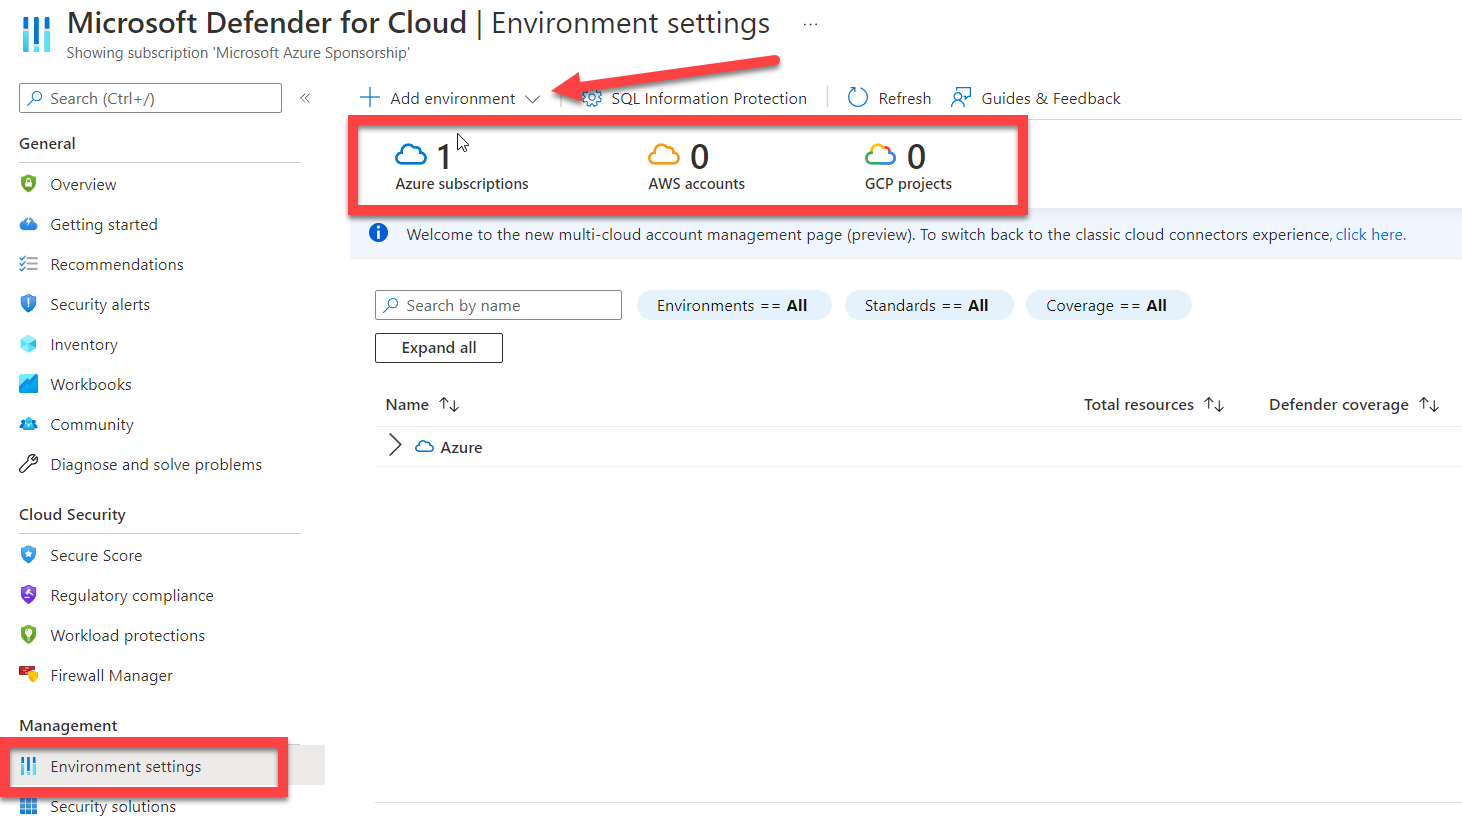
Go to the Environment settings where the Azure subscription was listed. Here you will see that there are Azure subscriptions, AWS accounts, and GCP projects counts at the top of the tile. Select the drop-down for + Add environment as shown in the screenshot below.
The drop-down provides a selection for either AWS or GCP.

Select AWS and you will be taken to the Account details for AWS, as shown in the below screenshot. Complete the information that is required and assign the AWS account to a resource group (or create a new resource group specifically for AWS).
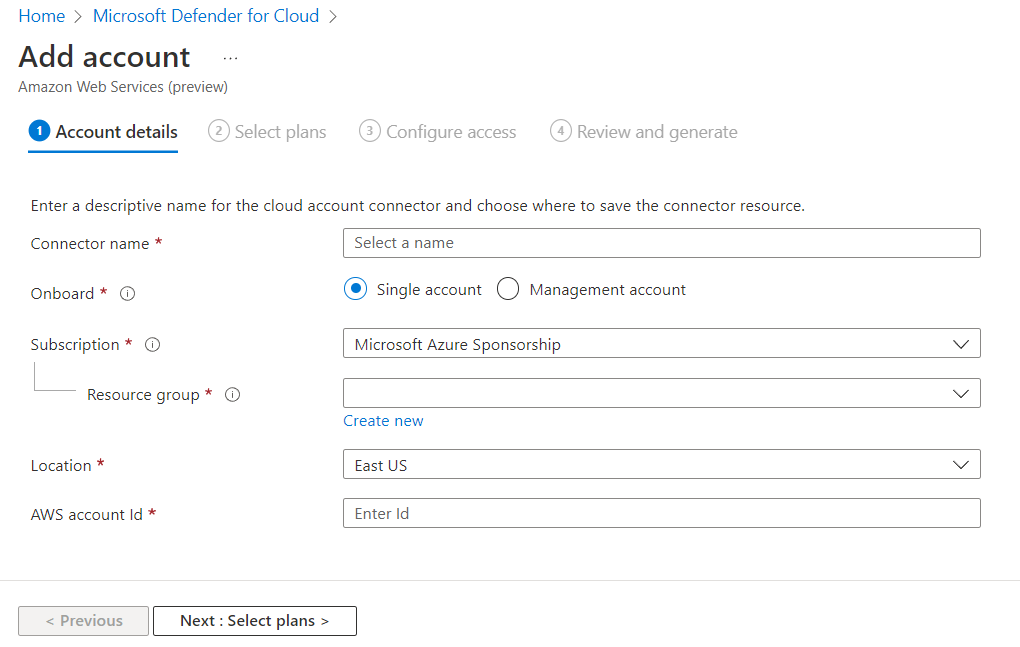
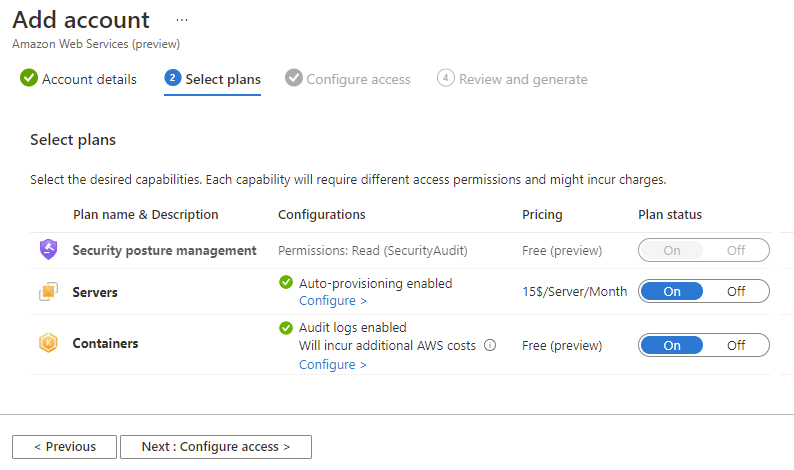
After providing the AWS account id, the next tile will allow you to select the Microsoft Defender plans for AWS, either EC2 servers and/or Amazon EKS containers. After that, you will configure access using a CloudFormation template, and then initiate the Azure Arc deployment to your AWS account.
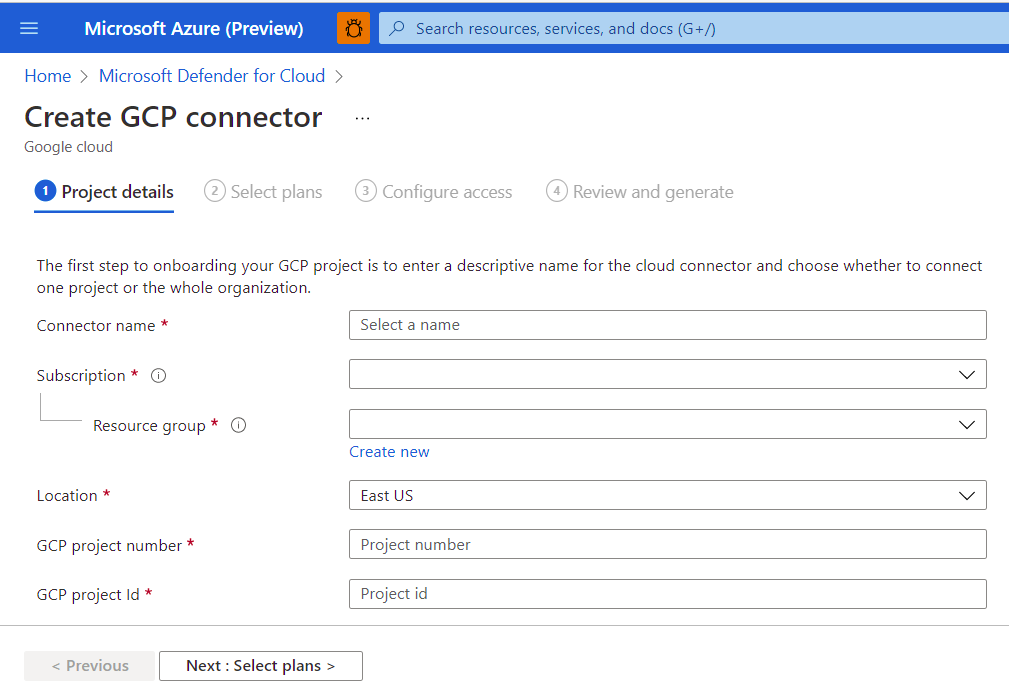
When configuring GCP the project details replace the account details and you need a GCP project number and project id.
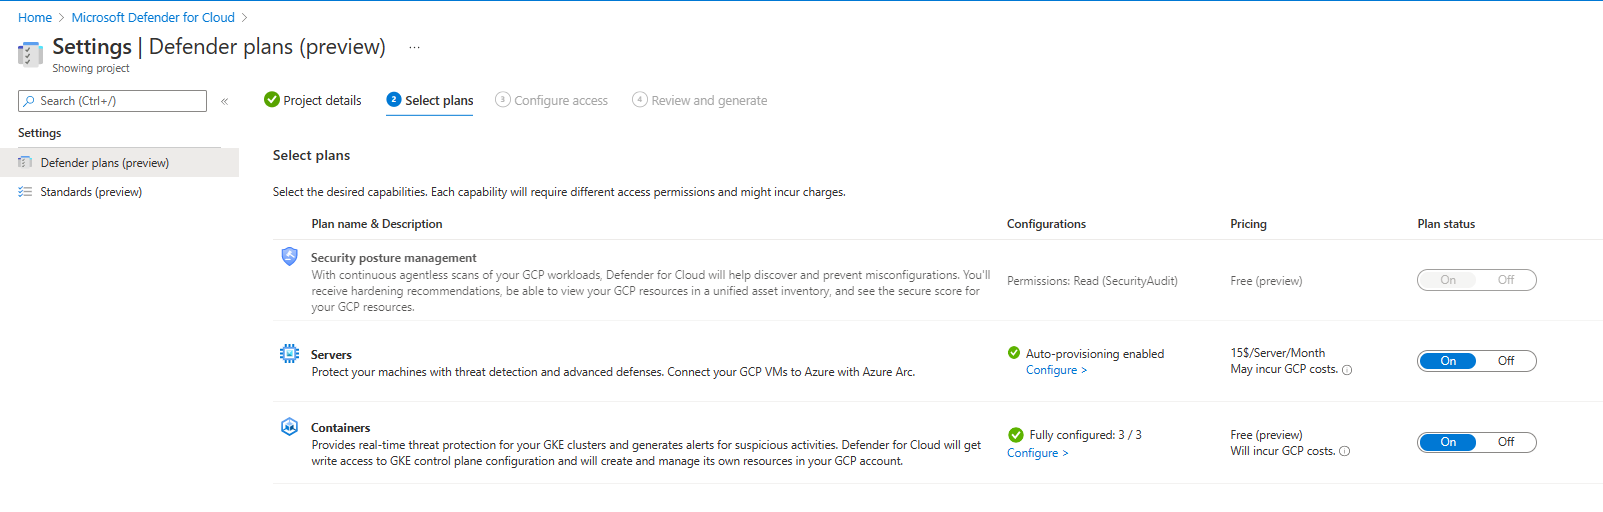
The Select plans have servers, containers, and also a Security posture management plan. The Security posture management requires SecurityAudit read permissions to be enabled.
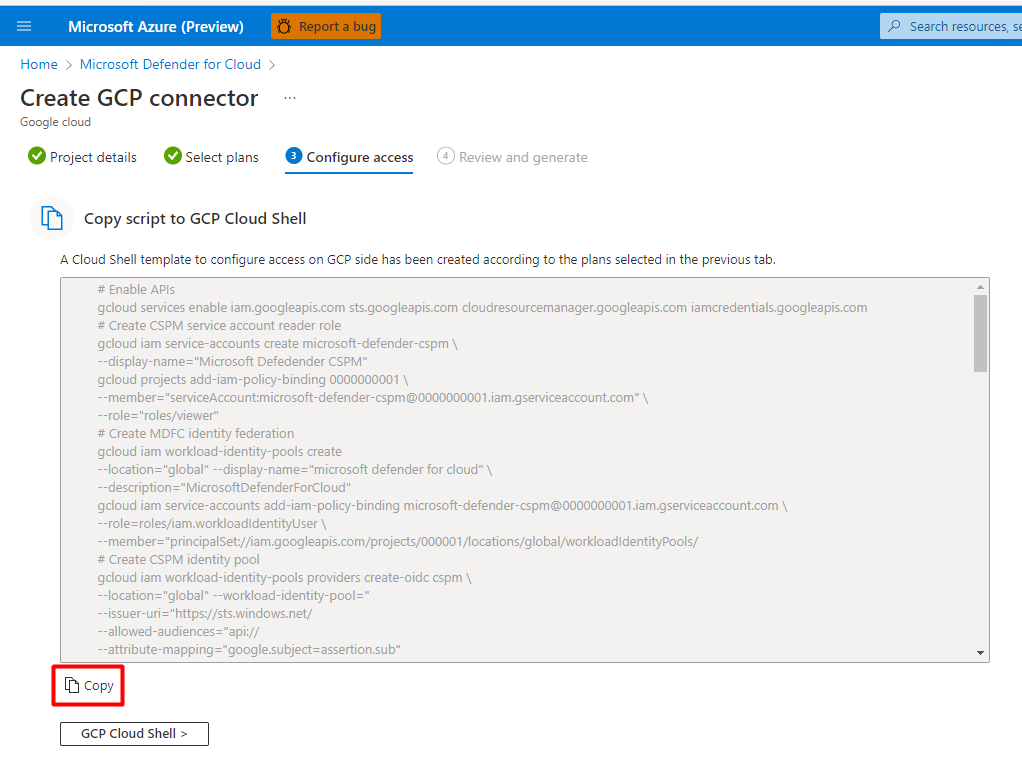
To configure access to the GCP project, a script is created in the Microsoft Defender for Cloud settings that you will copy and then open the GCP Cloud Shell button at the bottom of the tile, as shown in the below screenshot.
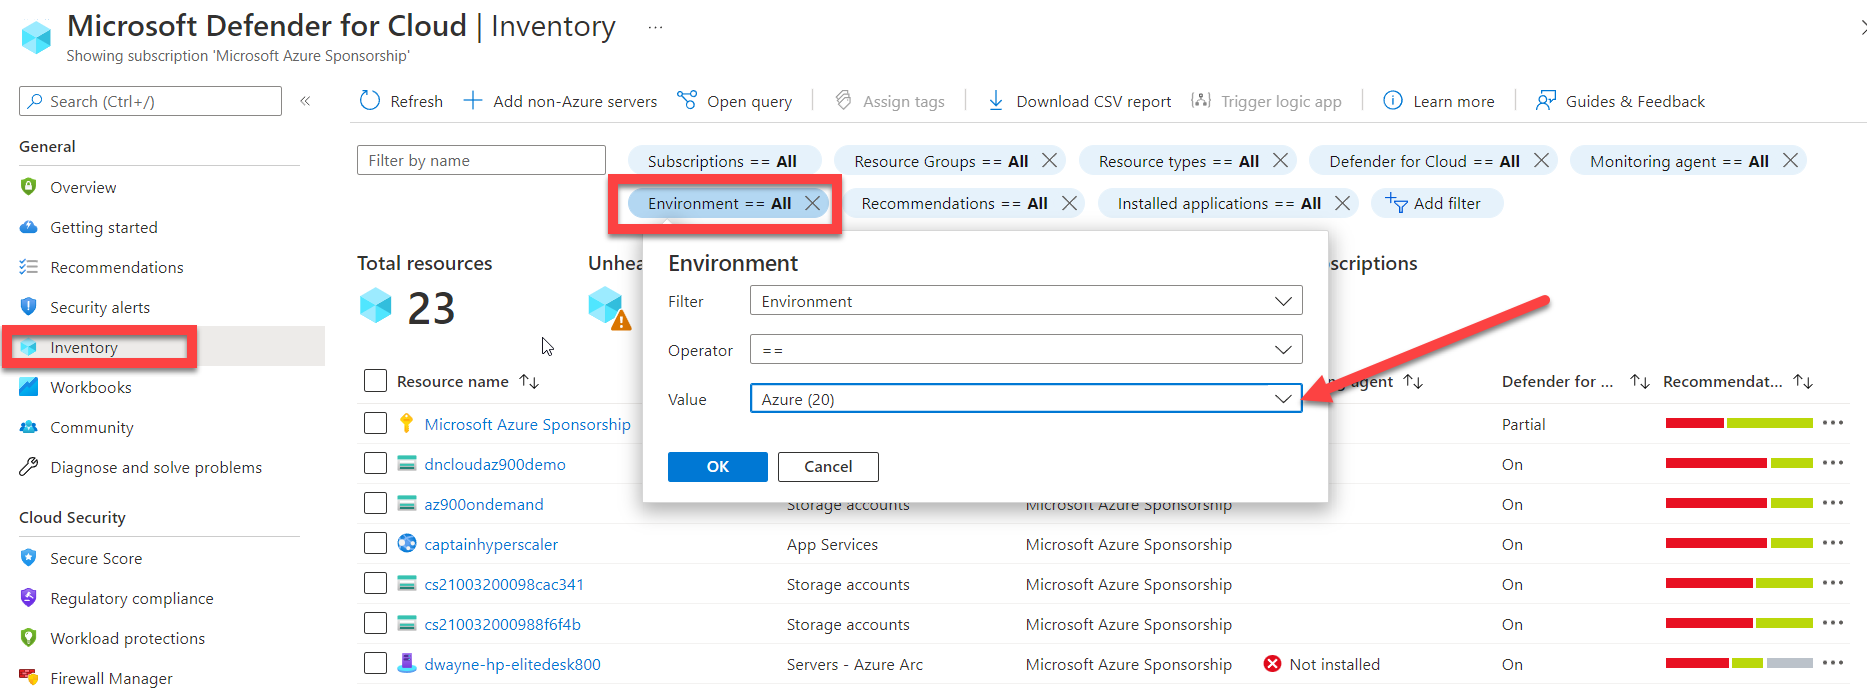
After the access has been configured, you are ready to deploy Azure Arc. Since we previously configured Microsoft Defender for Cloud plans and Auto provisioning, when this deployment of Azure Arc is complete, you will begin to see the AWS and GCP compute resources populate in Microsoft Defender for Cloud. You can confirm this by going to Inventory in the General menu for Microsoft Defender for Cloud. In the Inventory tile, locate Environment and change the value to the cloud provider that you would like to review.
You now have completed the setup for AWS and GCP compute workloads to be monitored and managed through Microsoft Defender for Cloud.
I hope that you enjoyed reading this document and now have a better understanding of how Microsoft Defender for Cloud can be used for security posture management and compliance across your hybrid and multi-cloud infrastructures.
Thank you and enjoy the rest of Azure Spring Clean.
Reference links:
https://docs.microsoft.com/en-us/azure/defender-for-cloud/quickstart-onboard-aws?pivots=env-settings
https://docs.microsoft.com/en-us/azure/defender-for-cloud/quickstart-onboard-gcp?pivots=env-settings